Django ChatGPT Tutorial Series:
- Introduction
- Create Django Project with Modern Frontend Tooling
- Create Chat App
- Partial Form Submission With Turbo Frame
- Use Turbo Stream To Manipulate DOM Elements
- Send Turbo Stream Over Websocket
- Using OpenAI Streaming API With Celery
- Use Stimulus to Better Organize Javascript Code in Django
- Use Stimulus to Render Markdown and Highlight Code Block
- Use Stimulus to Improve UX of Message Form
- Source Code chatgpt-django-project
In this article, we will learn what is Websocket and how to send Turbo Stream over Websocket, this can let us update the page in real-time.
Objective
- Learn what is Websocket
- Learn Django Channels
- Send Turbo Stream element over Websocket to update the page
Background
WebSocket
WebSocket is a computer communications protocol, providing full-duplex communication channels over a single TCP connection.
When a web client establishes a WebSocket connection with a server, the connection stays alive and the client and server can send messages to each other in real-time.
WebSocket is fully supported by all modern browsers:
ASGI vs WSGI
ASGI is a spiritual successor to WSGI, the long-standing Python standard for compatibility between web servers, frameworks, and applications.
In short, ASGI was created to add support for WebSockets, HTTP/2, and async/await, none of which are supported by WSGI. Like WSGI, it's an interface between Django and a web server (like Nginx).
Concepts
Django Channels
Django Channels is a project that takes Django and extends its abilities beyond HTTP -- to handle WebSockets, chat protocols, IoT protocols, and more. It’s built on a Python specification called ASGI.
In Django Channels:
- Consumers are akin to regular Django views. However, regular views can only process incoming requests whereas a consumer can send and receive messages and react to a WebSocket connection being opened or closed.
- Channels are mailboxes that messages can be sent to. Each channel has a name. Anyone who has the name of a channel can send a message to that channel.
- Groups are collections of related channels. Each group has a name. Anyone who has the name of a group can add or remove a channel to the group by name and send a message to all channels in the group.
Setting up Redis
Since we will use Redis as our channel layer backend, we need to install Redis first.
With Docker
Start by installing Docker if you haven't already done so. Then, open your terminal and run the following command:
$ docker run -p 6379:6379 --name some-redis -d redisThis downloads the official Redis Docker image from Docker Hub and runs it on port 6379 in the background.
To test if Redis is up and running, run:
$ docker exec -it some-redis redis-cli pingYou should see:
PONG
Without Docker
Either download Redis from source or via a package manager (like APT, YUM, Homebrew, or Chocolatey) and then start the Redis server via:
$ redis-serverTo test if Redis is up and running, run:
$ redis-cli pingYou should see:
PONGChannels
First, add below packages to requirements.txt:
redis==4.6.0
channels==4.0.0
daphne==4.0.0
channels-redis==4.1.0
Add daphne and channels to the INSTALLED_APPS in chatgpt_django_app/settings.py
Please make sure daphne is at the top
INSTALLED_APPS = [
    'daphne',       # should put this on top
    'django.contrib.admin',
    'django.contrib.auth',
    'django.contrib.contenttypes',
    'django.contrib.sessions',
    'django.contrib.messages',
    'django.contrib.staticfiles',

    'webpack_boilerplate',
    'turbo_response',
    'channels',

    'chatgpt_django_app.chat',
]
Also, in your settings comment out the WSGI_APPLICATION:
# WSGI_APPLICATION = 'chatgpt_django_app.wsgi.application'And add the ASGI_APPLICATION config:
ASGI_APPLICATION = 'chatgpt_django_app.asgi.application'Finally, add the channels config:
CHANNEL_LAYERS = {
    'default': {
        'BACKEND': 'channels_redis.core.RedisChannelLayer',
        'CONFIG': {
            "hosts": ["redis://127.0.0.1:6379/0"],
        },
    },
}
Next, update chatgpt_django_app/asgi.py:
import os

from channels.routing import ProtocolTypeRouter, URLRouter
from django.core.asgi import get_asgi_application
from chatgpt_django_app.chat import routing

os.environ.setdefault('DJANGO_SETTINGS_MODULE', 'chatgpt_django_app.settings')

application = ProtocolTypeRouter({
    "http": get_asgi_application(),
    'websocket': URLRouter(
        routing.urlpatterns
    )
})
Notes:
- chatgpt_django_app/asgi.py is the entry point into the app.
- By default, we do not need to config the HTTP router since Channels handles this for us.
- We added the
websocketrouter along withrouting.urlpatternsto point to thechatapp.
Create chatgpt_django_app/chat/routing.py
from django.urls import path

from chatgpt_django_app.chat import consumers


urlpatterns = [
    path("ws/turbo_stream/<group_name>/", consumers.HTMLConsumer.as_asgi()),
]
Create chatgpt_django_app/chat/consumers.py
from channels.generic.websocket import AsyncWebsocketConsumer


class HTMLConsumer(AsyncWebsocketConsumer):
    async def connect(self):
        group_name = self.scope["url_route"]["kwargs"]["group_name"]
        self.group_name = f"turbo_stream.{group_name}"

        await self.channel_layer.group_add(self.group_name, self.channel_name)

        await self.accept()

    async def disconnect(self, close_code):
        await self.channel_layer.group_discard(self.group_name, self.channel_name)

    async def html_message(self, event):
        """
        Send Turbo Stream html back to the client
        """
        html = event["html"]
        await self.send(text_data=html)
Notes:
- The logic here is very simple, when a WebSocket connection is established. It retrieves the group_name from the URL and add the client to the specific group.
- When it receives a message from the group, it sends the HTML back to the client.
Update chatgpt_django_app/templates/message_list_page.html to add below javascript code
<script>
    document.addEventListener("DOMContentLoaded", function () {
      const url = "/ws/turbo_stream/chat_{{ view.kwargs.chat_pk }}/"
      const source = new WebSocket(
        (location.protocol === "https:" ? "wss" : "ws") +
        "://" +
        window.location.host +
        url
      );
      Turbo.connectStreamSource(source);
    });
</script>
Notes:
- We create a websocket connection, and setup it up as Turbo Stream source.
- So if we pass the Turbo Stream elements over websocket to the client, the client will use them to automatically update the page.
Update the Page in External Process
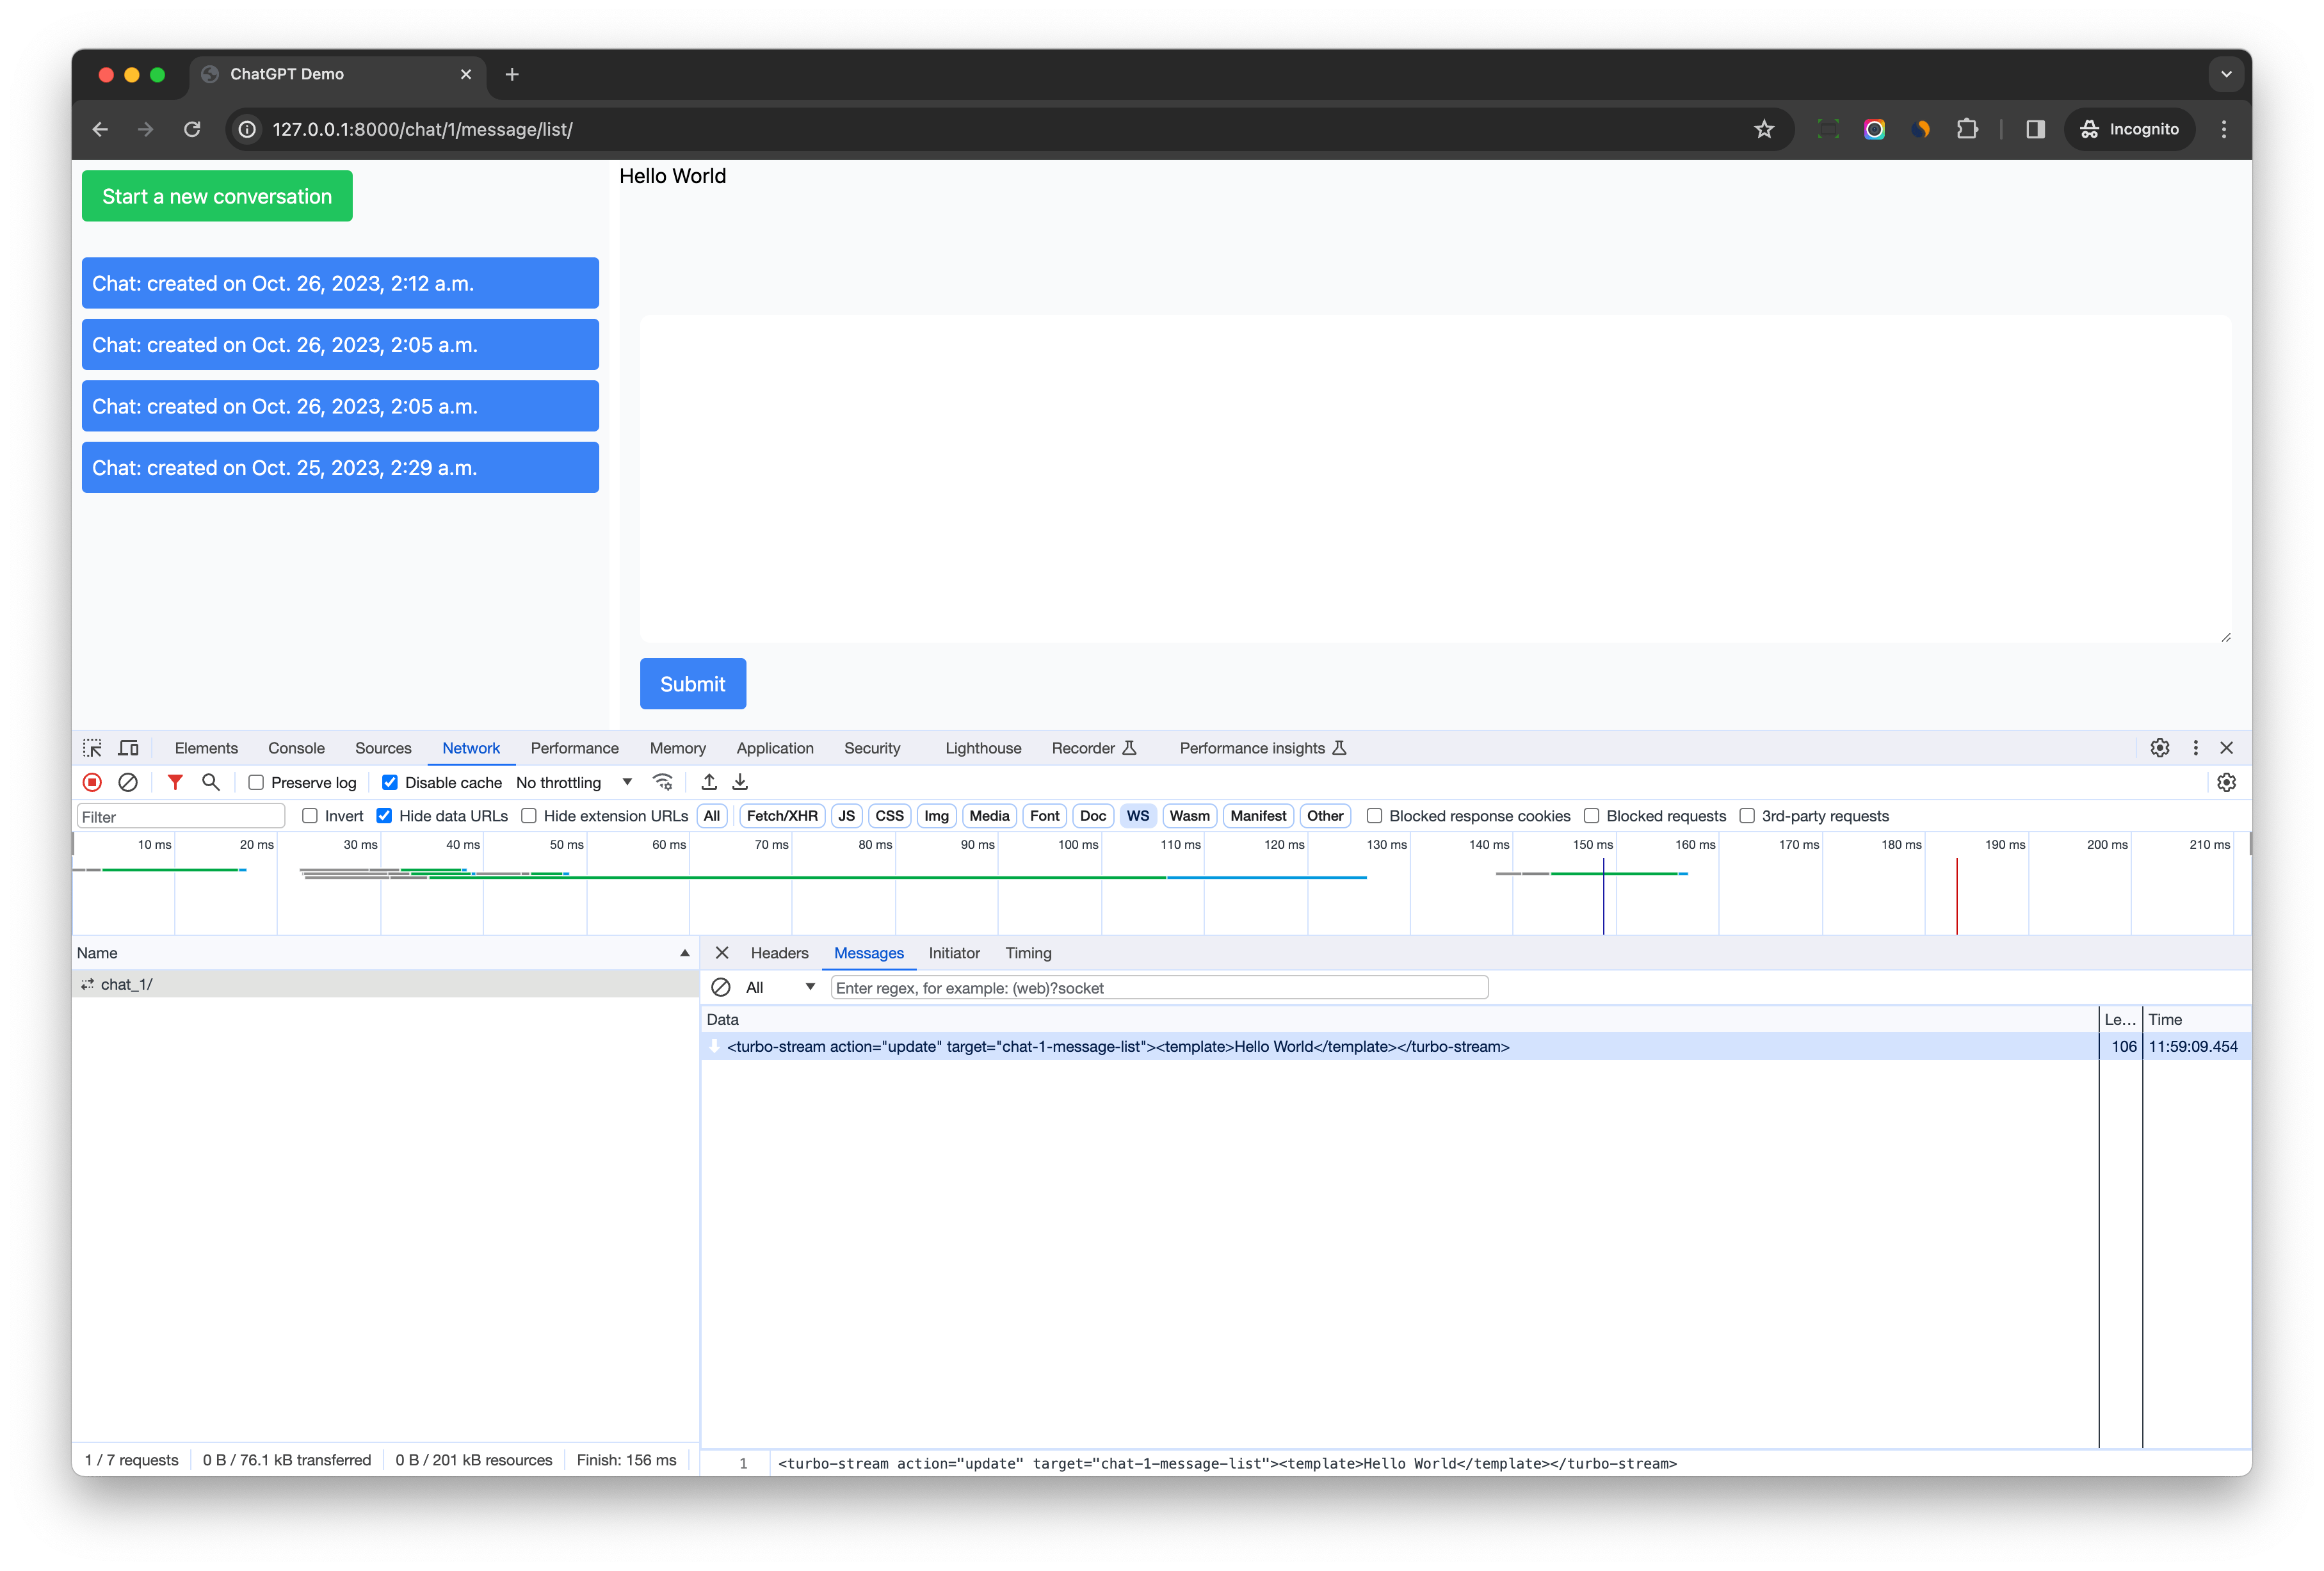
Let's open http://127.0.0.1:8000/chat/1/message/list/ in the browser.
Then a websocket connection to ws://127.0.0.1:8000/ws/turbo_stream/chat_1/ will be established.
Let's launch Django shell in a new terminal
(venv) $ python manage.py shellfrom asgiref.sync import async_to_sync
from channels.layers import get_channel_layer
channel_layer = get_channel_layer()
group_name = "turbo_stream.chat_1"
html = '<turbo-stream action="update" target="chat-1-message-list"><template>Hello World</template></turbo-stream>'
async_to_sync(channel_layer.group_send)(
group_name, {"type": "html_message", "html": html}
)Notes:
- Here in Django shell, we build a turbo stream element which update the
chat-1-message-listcontent toHello World - We send it to channel group
turbo_stream.chat_1, and the consumer will send the HTML back to the client. - The message list page will be updated to
Hello Worldautomatically, and we can see the data inWSunderNetworktab
View
Let's do the similar thing in the Django view
Update chatgpt_django_app/chat/views.py
class MessageCreateView(CreateView):

    # code omitted for brevity

    def form_valid(self, form):
        super().form_valid(form)
        request = self.request

        from asgiref.sync import async_to_sync
        from channels.layers import get_channel_layer

        channel_layer = get_channel_layer()
        group_name = f"turbo_stream.chat_{self.kwargs['chat_pk']}"
        html = (
            # user message
            TurboStream(f"chat-{self.kwargs['chat_pk']}-message-list")
                .append.template(
                "message_item.html",
                {
                    "instance": self.object,
                },
            ).render()
        )
        async_to_sync(channel_layer.group_send)(
            group_name, {"type": "html_message", "html": html}
        )

        ai_message = get_ai_response(self.object.pk)

        html = (
            # AI message
            TurboStream(f"chat-{self.kwargs['chat_pk']}-message-list")
                .append.template(
                "message_item.html",
                {
                    "instance": ai_message,
                },
            ).render()
        )
        async_to_sync(channel_layer.group_send)(
            group_name, {"type": "html_message", "html": html}
        )

        # return Turbo Stream to do partial updates on the page
        return TurboStreamResponse(
            [
                TurboStream("message-create-frame")
                    .replace.template(
                    self.template_name,
                    {
                        "form": self.get_empty_form(),
                        "request": request,
                        "view": self,
                    },
                ).response(request).rendered_content,
            ]
        )
Notes:
- In the form_valid method, after the user message is created, we send first turbo stream element to channel layer, to append the user message to the message list.
- And then, we call
get_ai_responseto get the AI response, and send the second turbo stream element to channel layer, to append the AI response to the message list. - In the end, we send the third turbo stream element over HTTP as POST response, to reset the form.
Blocking Issue
If the response from OpenAI is long (for example: "Please generate a blog post about AI for me, it will have about 500 words."), user need to wait some seconds before seeing the response.
Because the web process is blocked calling the OpenAI API.
We will use OpenAI streaming and Celery to solve this problem in the next chapter.
Conclusion
In this chapter, we have learned how to send Turbo Stream over WebSocket to update the page in real time.
This is a very powerful feature since we can update the page from distributed worker processed directly.
Django ChatGPT Tutorial Series:
- Introduction
- Create Django Project with Modern Frontend Tooling
- Create Chat App
- Partial Form Submission With Turbo Frame
- Use Turbo Stream To Manipulate DOM Elements
- Send Turbo Stream Over Websocket
- Using OpenAI Streaming API With Celery
- Use Stimulus to Better Organize Javascript Code in Django
- Use Stimulus to Render Markdown and Highlight Code Block
- Use Stimulus to Improve UX of Message Form
- Source Code chatgpt-django-project