The Full-Stack Django Series:
Objectives
Form validation is an important feature for web applications, and there are many ways to do it.
In this tutorial, I will talk about some different ways to do form validation in Django, and compare them to help you choose the best way in your project.
After reading this article, you will learn:
- What is Built-in Form Validation in HTML
- How to use Javascript to do client form validation
- How to use
jQuery ValidationorParsleyto do client form validation, and how they work - How to use
Yupto do client form validation - How to use Django Form to do server form validation
- How to use Django Rest Framework to do server form validation
Built-in Form Validation
Built-in form validation uses HTML form validation features, which are supported by all modern browsers. It doesn't require any JavaScript.
For example:
required: Specifies whether a form field needs to be filled in before the form can be submitted.type: Specifies whether the data needs to be a number, an email address, or some other specific preset type.pattern: Specifies a regular expression that defines a pattern the entered data needs to follow.
Let's create test.html and open it in Chrome
<form>
  <label for="username">Username</label>
  <input id="username" name="username" required />
  <button>Submit</button>
</form>
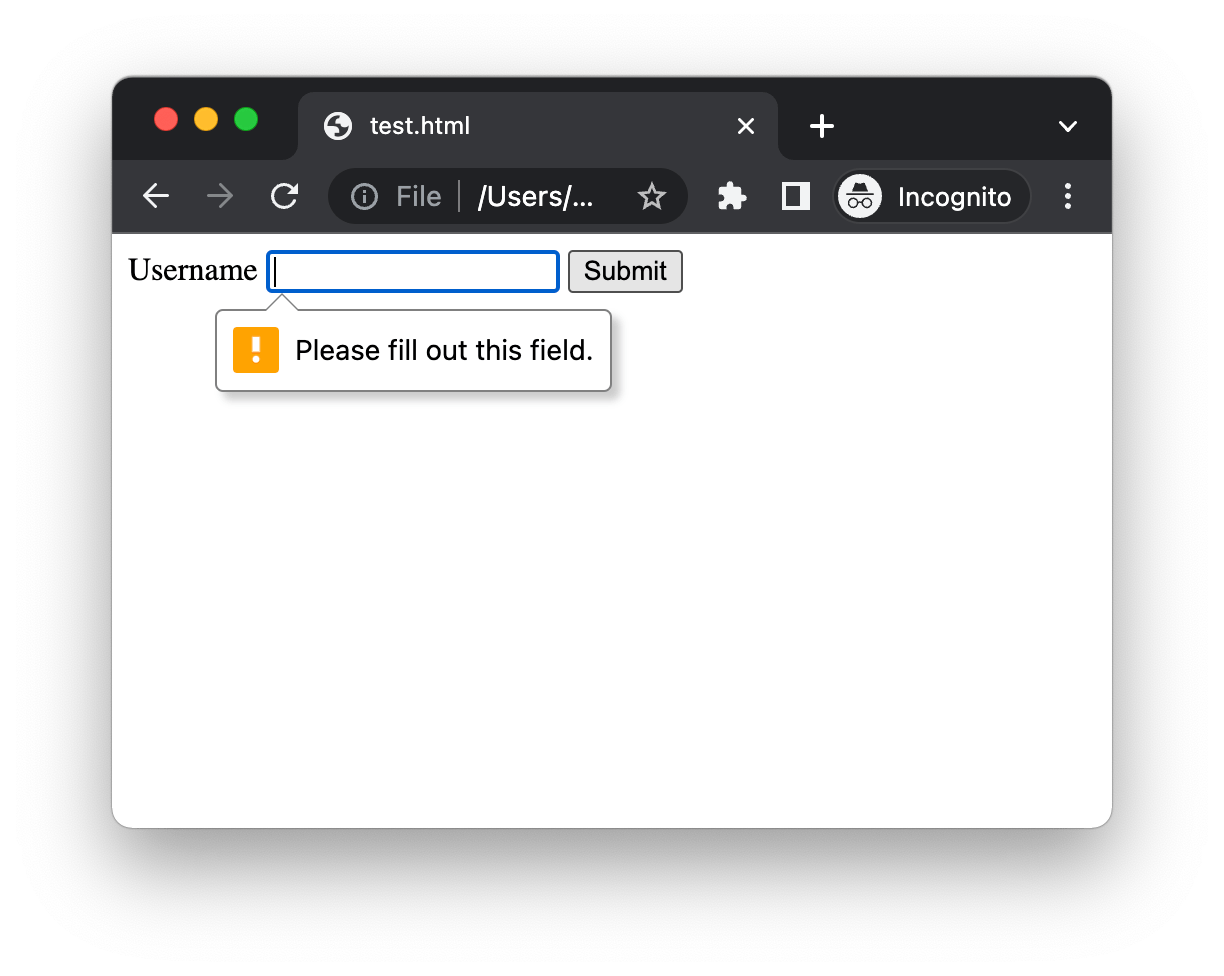
We add required attribute to the input element, and if we click the Submit button, the browser will check form inputs and display an error message.

Pseudo-Class
During the built-in form validation, if the element is valid, it will match :valid pseudo-class.
If the element is invalid, it will match :invalid pseudo-class.
Let's update test.html and open it in Chrome
<style>
  input:valid {
    background-color: palegreen;
  }

  input:invalid {
    background-color: lightpink;
  }
</style>

<form>
  <label for="username">Username</label>
  <input id="username" name="username" required />
  <button>Submit</button>
</form>
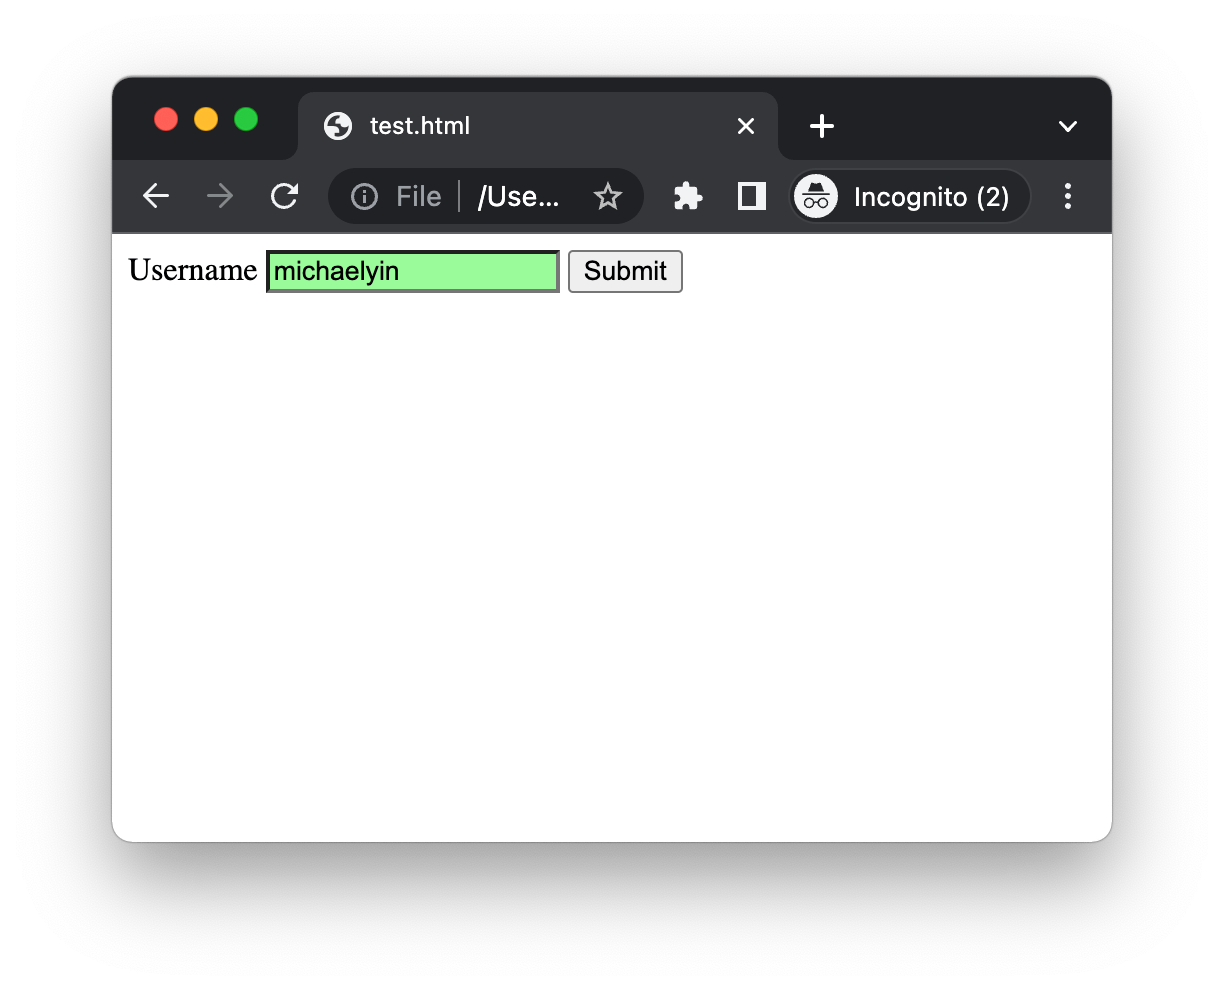
Here we use CSS code to improve the style of the built-in form validation.
You can input username to the input field and you will see the background color will change.

Tailwind CSS
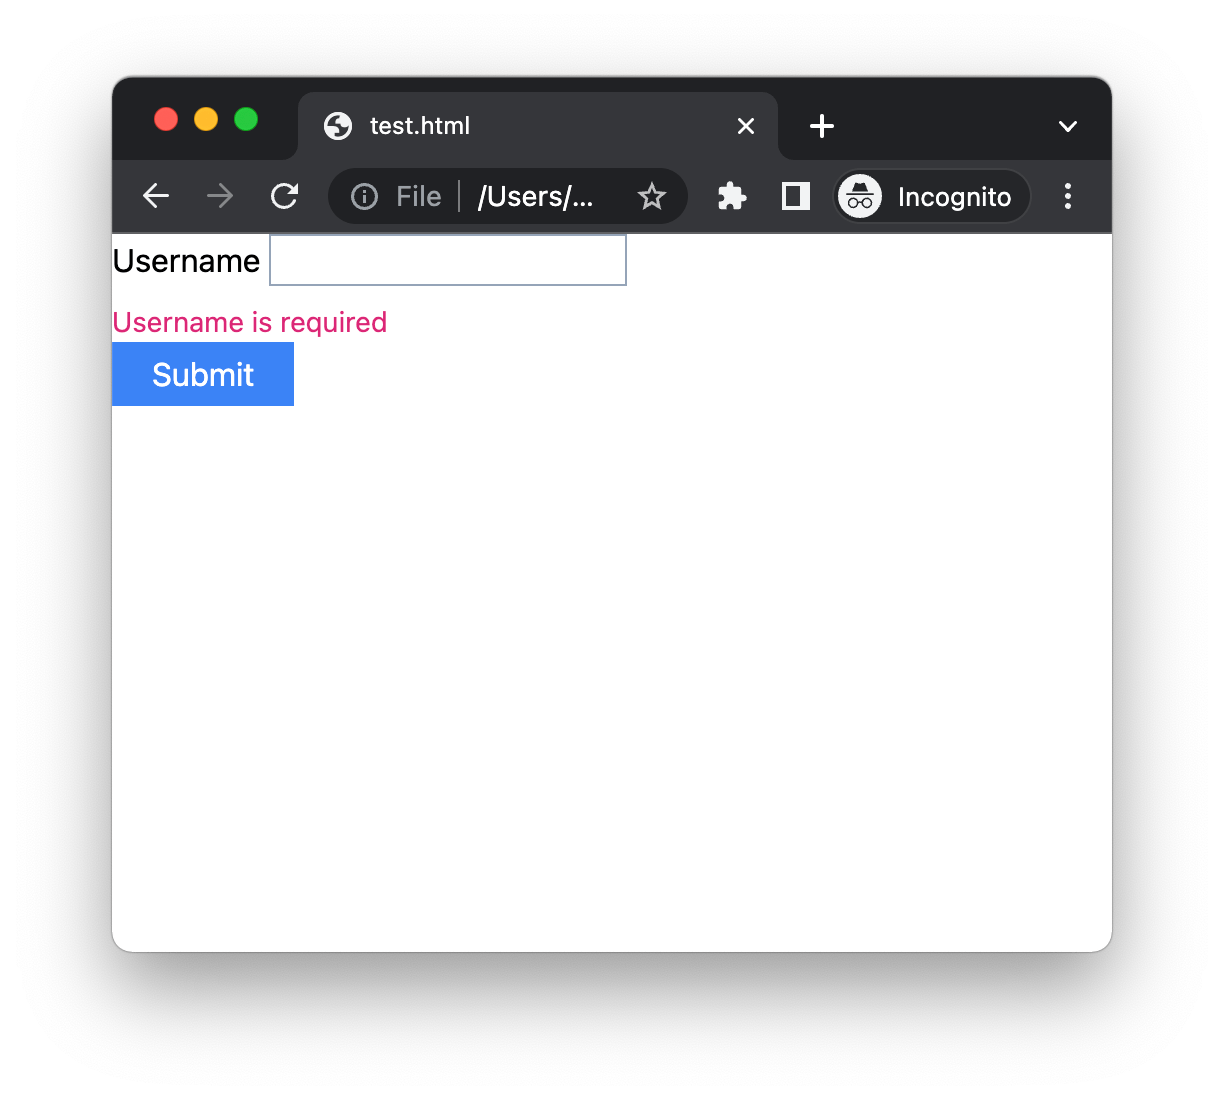
Tailwind also provides peer and peer-invalid, which can help us improve style of the built-in form validation. (https://tailwindcss.com/docs/hover-focus-and-other-states#styling-based-on-sibling-state)
Here is a simple example:
<script src="https://cdn.tailwindcss.com"></script>

<form>
  <label for="username">Username</label>
  <input id="username" name="username" class="peer border border-slate-400" required />
  <p class="mt-2 invisible peer-invalid:visible text-pink-600 text-sm">
    Username is required
  </p>
  <button class="bg-blue-500 text-white px-5 py-1">Submit</button>
</form>
Pros and Cons
Pros:
- It is simple to use.
- The validation is done by Browser
Cons:
- Not flexible, and it's hard to customize.
To know more about the built-in form validation, you can read https://developer.mozilla.org/en-US/docs/Web/HTML/Constraint_validation
Javascript
If we want more control and better user experience, we need Javascript (Constraint Validation API).
Update test.html and open it in Chrome
<form >
  <label for="username">Username</label>
  <input id="username" name="username" pattern="[a-z\d]+" required />
  <button>Submit</button>
</form>

<script>
  const username = document.getElementById("username");

  username.addEventListener("input", (event) => {
    if (username.validity.patternMismatch) {
      username.setCustomValidity("Only letters and numbers are allowed for username");
    } else {
      username.setCustomValidity("");
    }
  });

</script>
Notes:
- We add pattern
pattern="[a-z\d]+"to theusernamefield. - We use Javascript to handle
inputevent for the username field, ifpatternMismatchistrue, we render specific error message.
Turn Off Built-in Form Validation
<form method="post" novalidate>
  <label for="username">Username</label>
  <input id="username" name="username" pattern="[a-z\d]+" required />
  <div id="usernameError"></div>
  <button>Submit</button>
</form>

<script>
  const username = document.getElementById("username");
  const form = document.querySelector("form");
  const usernameError = document.getElementById("usernameError");

  username.addEventListener("input", (event) => {
    if (username.validity.valid) {
      // reset
      usernameError.textContent = "";
      usernameError.className = "";
    } else {
      displayError();
    }
  });

  form.addEventListener("submit", (event) => {
    if (!username.validity.valid) {
      displayError();
      // prevent form from being submitted
      event.preventDefault();
    }
    // if everything is valid, form will be submitted
  });

  function displayError(){
    if (username.validity.patternMismatch) {
      usernameError.textContent = "Only letters and numbers are allowed for username";
    }

    usernameError.classList.add("error")
  }

</script>
Notes:
- If we add
novalidateattribute to the form, then browser will not do automatic validation when we submit the form. - We can still access
username.validityto check if the field has valid value or not. - In the form submit handler, we check if the field is valid, if not, we display the error and prevent the form submission by calling
event.preventDefault()
If you want to do more complex validation, we can do it in this way.
- In the field
inputevent handler, we write custom Javascript to do validation - We use an
objecterrorMessagesto store the validation error messages for all fields. - In the form submit handler, we check the
errorMessagesand then decide if we should submit the form or not.
Pros and Cons
Pros:
- It is simple to use, we do not need to load additional libraries
Cons:
- We need to write a little more Javascript code to do the validation, which is not very convenient.
To learn more, please check Validating forms using JavaScript
jQuery Validation
jQuery Validation is a jQuery plugin that makes simple client side form validation easy, whilst still offering plenty of customization options.
Let's look at the example:
<script src="https://cdnjs.cloudflare.com/ajax/libs/jquery/3.6.4/jquery.min.js"></script>
<script src="https://cdnjs.cloudflare.com/ajax/libs/jquery-validate/1.19.5/jquery.validate.min.js"></script>

<form method="post">
  <label for="username">Username</label>
  <input id="username" name="username" pattern="[a-z\d]+" required />
  <div id="usernameError"></div>
  <button>Submit</button>
</form>

<script>
  $(document).ready(function () {

    // Add custom validator
    $.validator.addMethod('usernamePattern', function (value) {
      return /[a-z\d]+/.test(value);
    }, 'Only letters and numbers are allowed for username');

    $("form").validate({
      rules: {
        username: {
          required: true,
          usernamePattern: true
        },
      },
      submitHandler: function (form) {
        form.submit();
      }

    });
  });
</script>
Notes:
- We add
usernamePatternmethod to the$.validatorobject. - We use
$("form").validateto pass options to the validator. - If client validation passed, we call
form.submit()to submit the form.
How jQuery Validation works?
jQuery Validationwould listen to thefocusin,focusout,keyupevents on the form fields, and then run code to validate the field. https://github.com/jquery-validation/jquery-validation/blob/1.19.5/src/core.js#L427- It would also listen to the
form submitevent, and then run code to validate the form if user try to submit the form. https://github.com/jquery-validation/jquery-validation/blob/1.19.5/src/core.js#L46 - If form pass the client validation, it would submit the form or call the
submitHandlerfunction.
In jQuery Validation, the validation rules are defined in the Javascript file, if we want to make it read rules from the HTML element attributes, you can check https://github.com/aspnet/jquery-validation-unobtrusive
Pros and Cons
Pros:
- It provides many features, and you can quickly get things done.
- Very flexible and there are many 3-party resources about it.
Cons:
- It depends on jQuery, new projects may not want to use jQuery.
Parsley
Parsley.js is another popular form validation library (which is similar with jQuery Validation).
It can let developers define validation rules in the HTML element directly.
<!-- this optional textarea have a length validator that would be checked on keyup after 10 first characters, with a custom message only for minlength validator -->
<label for="message">Message (20 chars min, 100 max) :</label>
<textarea name="message"
          data-parsley-trigger="keyup"
          data-parsley-minlength="20"
          data-parsley-maxlength="100"
          data-parsley-validation-threshold="10"
          data-parsley-minlength-message="Come on! You need to enter at least a 20 characters long comment..">
</textarea>
Yup
Yup is a JavaScript schema builder for value parsing and validation. Define a schema, transform a value to match, validate the shape of an existing value, or both. Yup schema are extremely expressive and allow modeling complex, interdependent validations, or value transformations.
Yup focus on the value validation, we can use it to validate the form values in flexible ways, and it is a very popular option for some modern frontend frameworks like React, Vue, Angular, etc.
We can use Yup to validate the form values, and then display the validation error messages if we need.
// here we can validate in the submit handler, you can also make it work on the field level

// build validation schema
const schema = yup.object().shape({
  username: yup
    .string()
    .required("Username is required")
    .matches(/^[a-zA-Z0-9.\-_]+$/, "Username must contain only letters, numbers, underscore, dot or dash character"),
});

// convert form data to object
const formData = new FormData(formElem);
const objectData = {};
formData.forEach(function(value, key){
  objectData[key] = value;
});

try {
  await schema.validate(objectData, { abortEarly: false });
} catch (error) {
  // display validation error
  console.log(error);
  return;
}

// if validation passed, submit the form
Notes:
- Yup can also work with
Promise, so we can use it do Ajax validation just like jQuery Validation. - Compared with jQuery Validation, it is more flexible, we can define the validation rules in the Javascript file, or in the HTML element attributes. We can even build domain specific language (DSL) to define the validation rules in our own way.
- It only focuses on value validation, so it is not a complete form validation solution, we need to write more code to manipulate DOM elements to display the validation error messages in some cases.
If you want to try Yup in Django, I recommend embrace frontend engineering, and use npm install to install it.
You can check https://github.com/AccordBox/python-webpack-boilerplate for a quick start.
Pros and Cons
Pros:
- It provides many features, the
schemamodel makes it easy to customize.
Cons:
- Developers need to write some Javascript to display the validation error messages.
Server-side Validation 1: Django Form
Client-side validation should not be considered an exhaustive security measure! Your apps should always perform security checks on any form-submitted data on the server-side as well.
Next, I will talk about some server-side form validation solutions.
Let's define a Django form:
from django import forms
from django.core.validators import RegexValidator


class TestForm(forms.Form):
    username = forms.CharField(
        max_length=100,
        required=True,
        validators=[
            RegexValidator(
                '^[a-zA-Z0-9.\-_]+$',
                message="Username must contain only letters, numbers, underscore, dot or dash character"
            )
        ]
    )
Here we create a Django form to validate the username on the server side.
Let's test some code in the Django shell
In [2]: form = TestForm()

In [3]: form.as_p()
Out[3]: '<p><label for="id_username">Username:</label> <input type="text" name="username" maxlength="100" required id="id_username"></p>'
As you can see, Django form can generate the HTML code for the form, and we can render it in the template.
<p>
  <label for="id_username">Username:</label>
  <input type="text" name="username" maxlength="100" required id="id_username">
</p>
After receiving POST request, we can use the is_valid() to validate the form data.
# validate the form data
In [4]: form = TestForm({'username': '@test'})

In [5]: form.is_valid()
Out[5]: False

In [6]: form.errors
Out[6]: {'username': ['Username must contain only letters, numbers, underscore, dot or dash character']}
Here we validated the form data on the server side, and we can get the validation error message from the form.errors property.
You can check Django Doc: Working with forms to learn more.
Pros and Cons
Pros:
- Simple to use
Cons:
- User needs to submit the form to server to get the validation error messages.
Server-side Validation 2: DRF Serializer
The Django REST framework Serializer is very similar with the Django Form, we can use it convert data to Python primitive types, and validate the data.
from django.core.validators import RegexValidator
from rest_framework import serializers


class TestSerializer(serializers.Serializer):
    username = serializers.CharField(
        validators=[
            RegexValidator(
                '^[a-zA-Z0-9.\-_]+$',
                message="Username must contain only letters, numbers, underscore, dot or dash character"
            )
        ]
    )
Let's test in Django shell
In [2]: serializer = TestSerializer(data={'username': '@test'})

In [3]: serializer.is_valid()
Out[3]: False

In [4]: serializer.errors
Out[4]: {'username': [ErrorDetail(string='Username must contain only letters, numbers, underscore, dot or dash character', code='invalid')]}
As you can see, the Django REST framework Serializer syntax is very similar with the Django form.
In most cases, developers need to write some Javascript to send JSON data from the Frontend App to DRF API and consume the response from the API. And this usually happen in React, Vue, Angular or other frontend frameworks.
For example, if the client get 400 Bad Request, which is validation error and client will display the error message to the user.
Pros and Cons
Pros:
- Simple to use
Cons:
- Developers might need to write form validation code in both frontend and backend.
Server-side Solution 3: HTML Through Ajax or Websocket
Let's think about the above solutions:
- Writing javascript for client-side validation take time.
- The traditional server-side validation (based on Django form) is not very friendly.
- User needs to click submit button, and then wait for the server response to see if it is valid or not, the whole page will be refreshed, the user experience is not good.
How about this way:
- User submit the form, Javascript inject the event and then send the form data to the server.
- After server returning the response, for example, the response contains some validation error message.
- The client javascript only refresh the
form parton the page. - So the user can still see the form validation error message immediately, and the whole page will not be refreshed.
This feature also called Partial update (or inline form validation) and it is becoming more and more popular.
The benefit of this workflow:
- Developers only write the server-side validation code.
- The user experience is improved, compared with the traditional server-side validation.
- This solution is a good fit for Rapid Prototyping.
Option 1: HTMX
HTMX is very popular in the Django community, and I recommend you to check this great blog post
Inline form validation with Django and Htmx
Option 2: Hotwire
Hotwire is the default frontend solution shipped in Ruby on Rails
The Turbo can help us implement the Partial update feature without writing any Javascript code.
As for the dynamic form, you can check this great blog post: Dynamic forms with Turbo
If you want to know how to use Hotwire with Django, please check my book The Definitive Guide to Hotwire and Django
Other Options
Unpoly do similar work as HTMX, you can check the demo if you are interested.
Pros and Cons
Pros:
- Very efficient for Rapid Prototyping.
- The user experience is improved, compared with the traditional server-side validation.
Cons:
- Developers need to learn some new technologies.
Conclusion
In this tutorial, I talked about some different ways to do form validation in Django projects, the concepts should also work with other web frameworks such as Flask, FastAPI, etc.
I hope you have learned something new from this tutorial. If you have any question, please feel free to contact me.
The Full-Stack Django Series: