Background
As a full stack developer, I usually write backend code and frontend code around Websocket for some real-time features.
And I also feel pain in some cases.
Pain Point 1: Auto Connecting
Websocket is a persistent connection between the client and the server, and I need it to auto connect when the client is disconnected.
It seems some projects such as https://github.com/pladaria/reconnecting-websocket can help solve this problem, but it seems not maintained for a long time.
Pain Point 2: Multiplexing
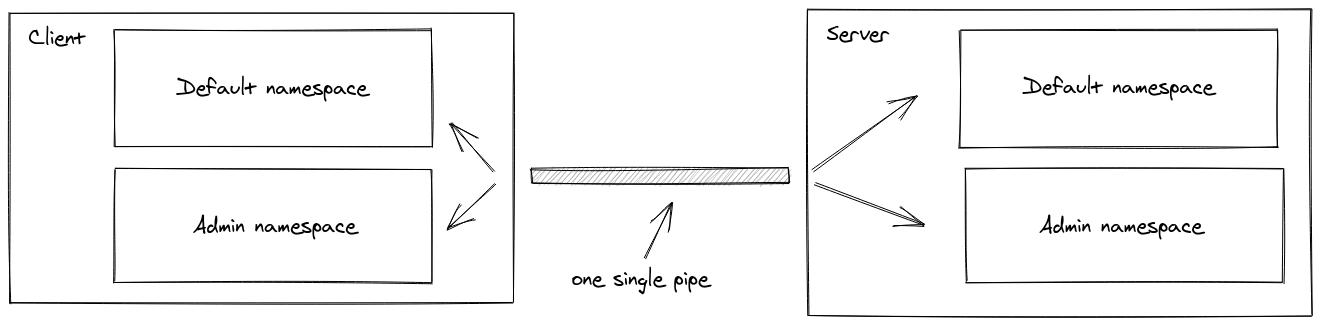
WebSocket multiplexing refers to the ability to establish multiple logical channels or subprotocols within a single WebSocket connection. It allows you to send and receive different types of data or messages over the same WebSocket connection, effectively multiplexing multiple streams of data.
With WebSocket multiplexing, we can handle multiple logical channels or subprotocols within a single Websocket connection. This reduces the need for multiple WebSocket connections, resulting in efficient utilization of network resources and reducing overhead.
Socket.IO, a popular JavaScript library for real-time web applications, uses multiplexing through namespaces, you can check image below
On the channels doc, I can see some projects, but they are not updated for long time.
Pain Point 3: Client Side Code Structure
Valina Javascript code is easy to understand but not easy to maintain. I want a better option which can help me write code in a more structured way:
const socket = new WebSocket('xxx');

socket.onopen = function(e) {
  alert("[open] Connection established");
};

socket.onmessage = function(event) {
  alert(`[message] Data received from server: ${event.data}`);
};
Code below seems better:
const cable = consumer.createConsumer();

cable.subscriptions.create("ChannelName", {
  connected() {
    console.log("Connection established");
  },
  received(data) {
    console.log(`Data received from server: ${data}`);
  },
});
Rails ActionCable
Rails ActionCable is the Websocket solution provided by Rails.
On the client side, it provides a Javascript library to connect to the Websocket server, and supports auto reconnect, multiplex, and client-side subscription model.
The code has been proven in production by many Rails apps for years and the code is easy to understand, you can do quick check here
The great thing is, the rails/actioncable is also published as a NPM package, which means we can import it (via CDN link or npm install) to our Django project and use it as a javascript lib.
<script src="https://cdn.jsdelivr.net/npm/@rails/[email protected]/app/assets/javascripts/actioncable.js"></script>Django ActionCable Support
On the server side, Rails ActionCable implemented a Websocket sub-protocol called actioncable-v1-json, the client use this protocol to communicate with the server.
{
  "command":"subscribe",
  "identifier":{
    "channel":"UserChatChannel",
    "current_chatroom_id":"123",
    "subscribed_user_id":"456"
  }
}
The message is JSON, so if our Django server can understand the actioncable-v1-json protocol, then the ActionCable Javascript lib should work with our Django server.
django-actioncable
django-actioncable provides Rails Action Cable support to Django Channels.
Next, I will show you how to use django-actioncable to make our Django app work with Rails ActionCable Javascript, we will use it to build a simple ChatRoom.
Create Django Project
Create a new project directory:
$ mkdir django-actioncable-demo && cd django-actioncable-demoThen, create and activate a new Python virtual environment:
$ python3.11 -m venv venv
$ source venv/bin/activate
(venv)$(venv)$ pip install django==5.0
(venv)$ django-admin startproject actioncable_demo .
(venv)$ python manage.py migrate
(venv)$ python manage.py runserverInstall django-actioncable
(venv)$ pip install daphne channels channels-redis
(venv)$ pip install django-actioncable
Add channels and daphne to the INSTALLED_APPS in actioncable_demo/settings.py:
Please make sure daphne is on top of the INSTALLED_APPS:
INSTALLED_APPS = [
    'daphne',  # should put this on top

    ...

    'channels',
]
Also, in your settings comment out the WSGI_APPLICATION:
# WSGI_APPLICATION = 'actioncable_demo.wsgi.application'And add the ASGI_APPLICATION config:
ASGI_APPLICATION = 'actioncable_demo.asgi.application'Finally, add the channels config:
CHANNEL_LAYERS = {
    'default': {
        'BACKEND': 'channels_redis.core.RedisChannelLayer',
        'CONFIG': {
            "hosts": [(os.environ.get("CHANNELS_REDIS", "redis://127.0.0.1:6379/0"))],
        },
    },
}
Notes:
- Please make sure redis server is running on your local machine, or you can use docker to start a redis server:
docker run -p 6379:6379 redis - Do not forget to add
import osat the top of the actioncable_demo/settings.py
Create Server Side ChatChannel
Next, we will create CableChannel on the server side, and this CableChannel is for the chat logic.
Update actioncable_demo/asgi.py
import os
from django.core.asgi import get_asgi_application
from django.urls import path
from channels.routing import ProtocolTypeRouter, URLRouter
from actioncable import ActionCableConsumer, CableChannel, cable_channel_register

os.environ.setdefault('DJANGO_SETTINGS_MODULE', 'actioncable_demo.settings')

# Rails ActionCable uses the /cable path by default
# It can also work with your legacy code without conflict
urlpatterns = [
    path("cable", ActionCableConsumer.as_asgi()),
]

application = ProtocolTypeRouter(
    {
        "http": get_asgi_application(),
        "websocket": URLRouter(urlpatterns)
    }
)


# Use cable_channel_register to register your channels
@cable_channel_register
class ChatChannel(CableChannel):

    def __init__(self, consumer: ActionCableConsumer, identifier_key, params=None):
        self.params = params if params else {}
        self.identifier_key = identifier_key
        self.consumer = consumer
        self.group_name = None

    async def subscribe(self):
        self.group_name = f"chat_{self.params['pk']}"
        await self.consumer.subscribe_group(self.group_name, self)

    async def unsubscribe(self):
        await self.consumer.unsubscribe_group(self.group_name, self)
Notes:
- actioncable_demo/asgi.py is the entry point into the app.
- By default, we do not need to config the HTTP router since Channels handles this for us.
- And we route the
websocketrequests to theURLRouter(urlpatterns), here we only have one URL pattern, which is/cable, and Websocket connections will be handled byActionCableConsumer. ActionCableConsumerwill dispatch the message to the relevantCableChannelaccording to theidentifierin the message.- Here we create a
ChatChannelwhich inherits from theCableChannel, and register it withcable_channel_registerdecorator. - In the
subscribecallback method, we get the room pk from theself.paramsdict and subscribe the channel to the channel groupchat_{pk}. - In the
unsubscribecallback method, we unsubscribe the channel from the channel group.
Create Client Side ChatChannel
We already created ChatChannel on the server side, now we will create ChatChannel on the client side, they are supposed to work together.
Update actioncable_demo/urls.py, add a view for the index page:
from django.contrib import admin
from django.urls import path
from django.views.generic import TemplateView

urlpatterns = [
    path('', TemplateView.as_view(template_name='index.html'), name='index'),     # new
    path('admin/', admin.site.urls),
]
Update actioncable_demo/settings.py
TEMPLATES = [
    {
        'BACKEND': 'django.template.backends.django.DjangoTemplates',
        'DIRS': [BASE_DIR / "templates"],             # new
        'APP_DIRS': True,
        'OPTIONS': {
            'context_processors': [
                'django.template.context_processors.debug',
                'django.template.context_processors.request',
                'django.contrib.auth.context_processors.auth',
                'django.contrib.messages.context_processors.messages',
            ],
        },
    },
]
Create templates/index.html
<!DOCTYPE html>
<html>
<head>
  <title>ActionCable Example</title>
</head>
<body>
<div id="messages"></div>

<script src="https://cdn.jsdelivr.net/npm/@rails/[email protected]/app/assets/javascripts/actioncable.js"></script>

<script>
  document.addEventListener("DOMContentLoaded", function () {
    // Create a consumer object to connect to the ActionCable server
    const cable = ActionCable.createConsumer();

    // Define a channel and its corresponding functions
    const channel = cable.subscriptions.create({channel: "ChatChannel", pk: "1"}, {
      connected() {
        console.log("Connected to the chat channel.");
      },

      disconnected() {
        console.log("Disconnected from the chat channel.");
      },

      received(data) {
        // Display the received message
        const messagesDiv = document.getElementById("messages");
        const messageDiv = document.createElement("div");
        messageDiv.innerText = data;
        messagesDiv.appendChild(messageDiv);
      }
    });
  });
</script>

</body>
</html>
Notes:
- In this template, we import
actioncable.jsfrom the CDN. - We use the
ActionCable.createConsumer()to create a consumer object to connect to the ActionCable server. - The ActionCable supports client-side subscription mode, so here we use
cable.subscriptions.createto subscribe. - The
channeisChatChannel, so theChatChannelwe just created on the server side will be used to handle the request. - In the client, we can pass room pk to the
ChatChannelbypk: "1", and in the backend we can get it in theself.params - In this case, the channel will
subscribeto thechat_1group. - When client receive message from the server, it will call the
receivedfunction, and we can display the message in themessagesdiv.
Before django-actioncable is used, developer usually put arguments in the Websocket URL. After using django-actioncable, we should pass the arguments in the cable.subscriptions.create method instead of the URL, so the multiplexing can work without issue.
Send Message to Client
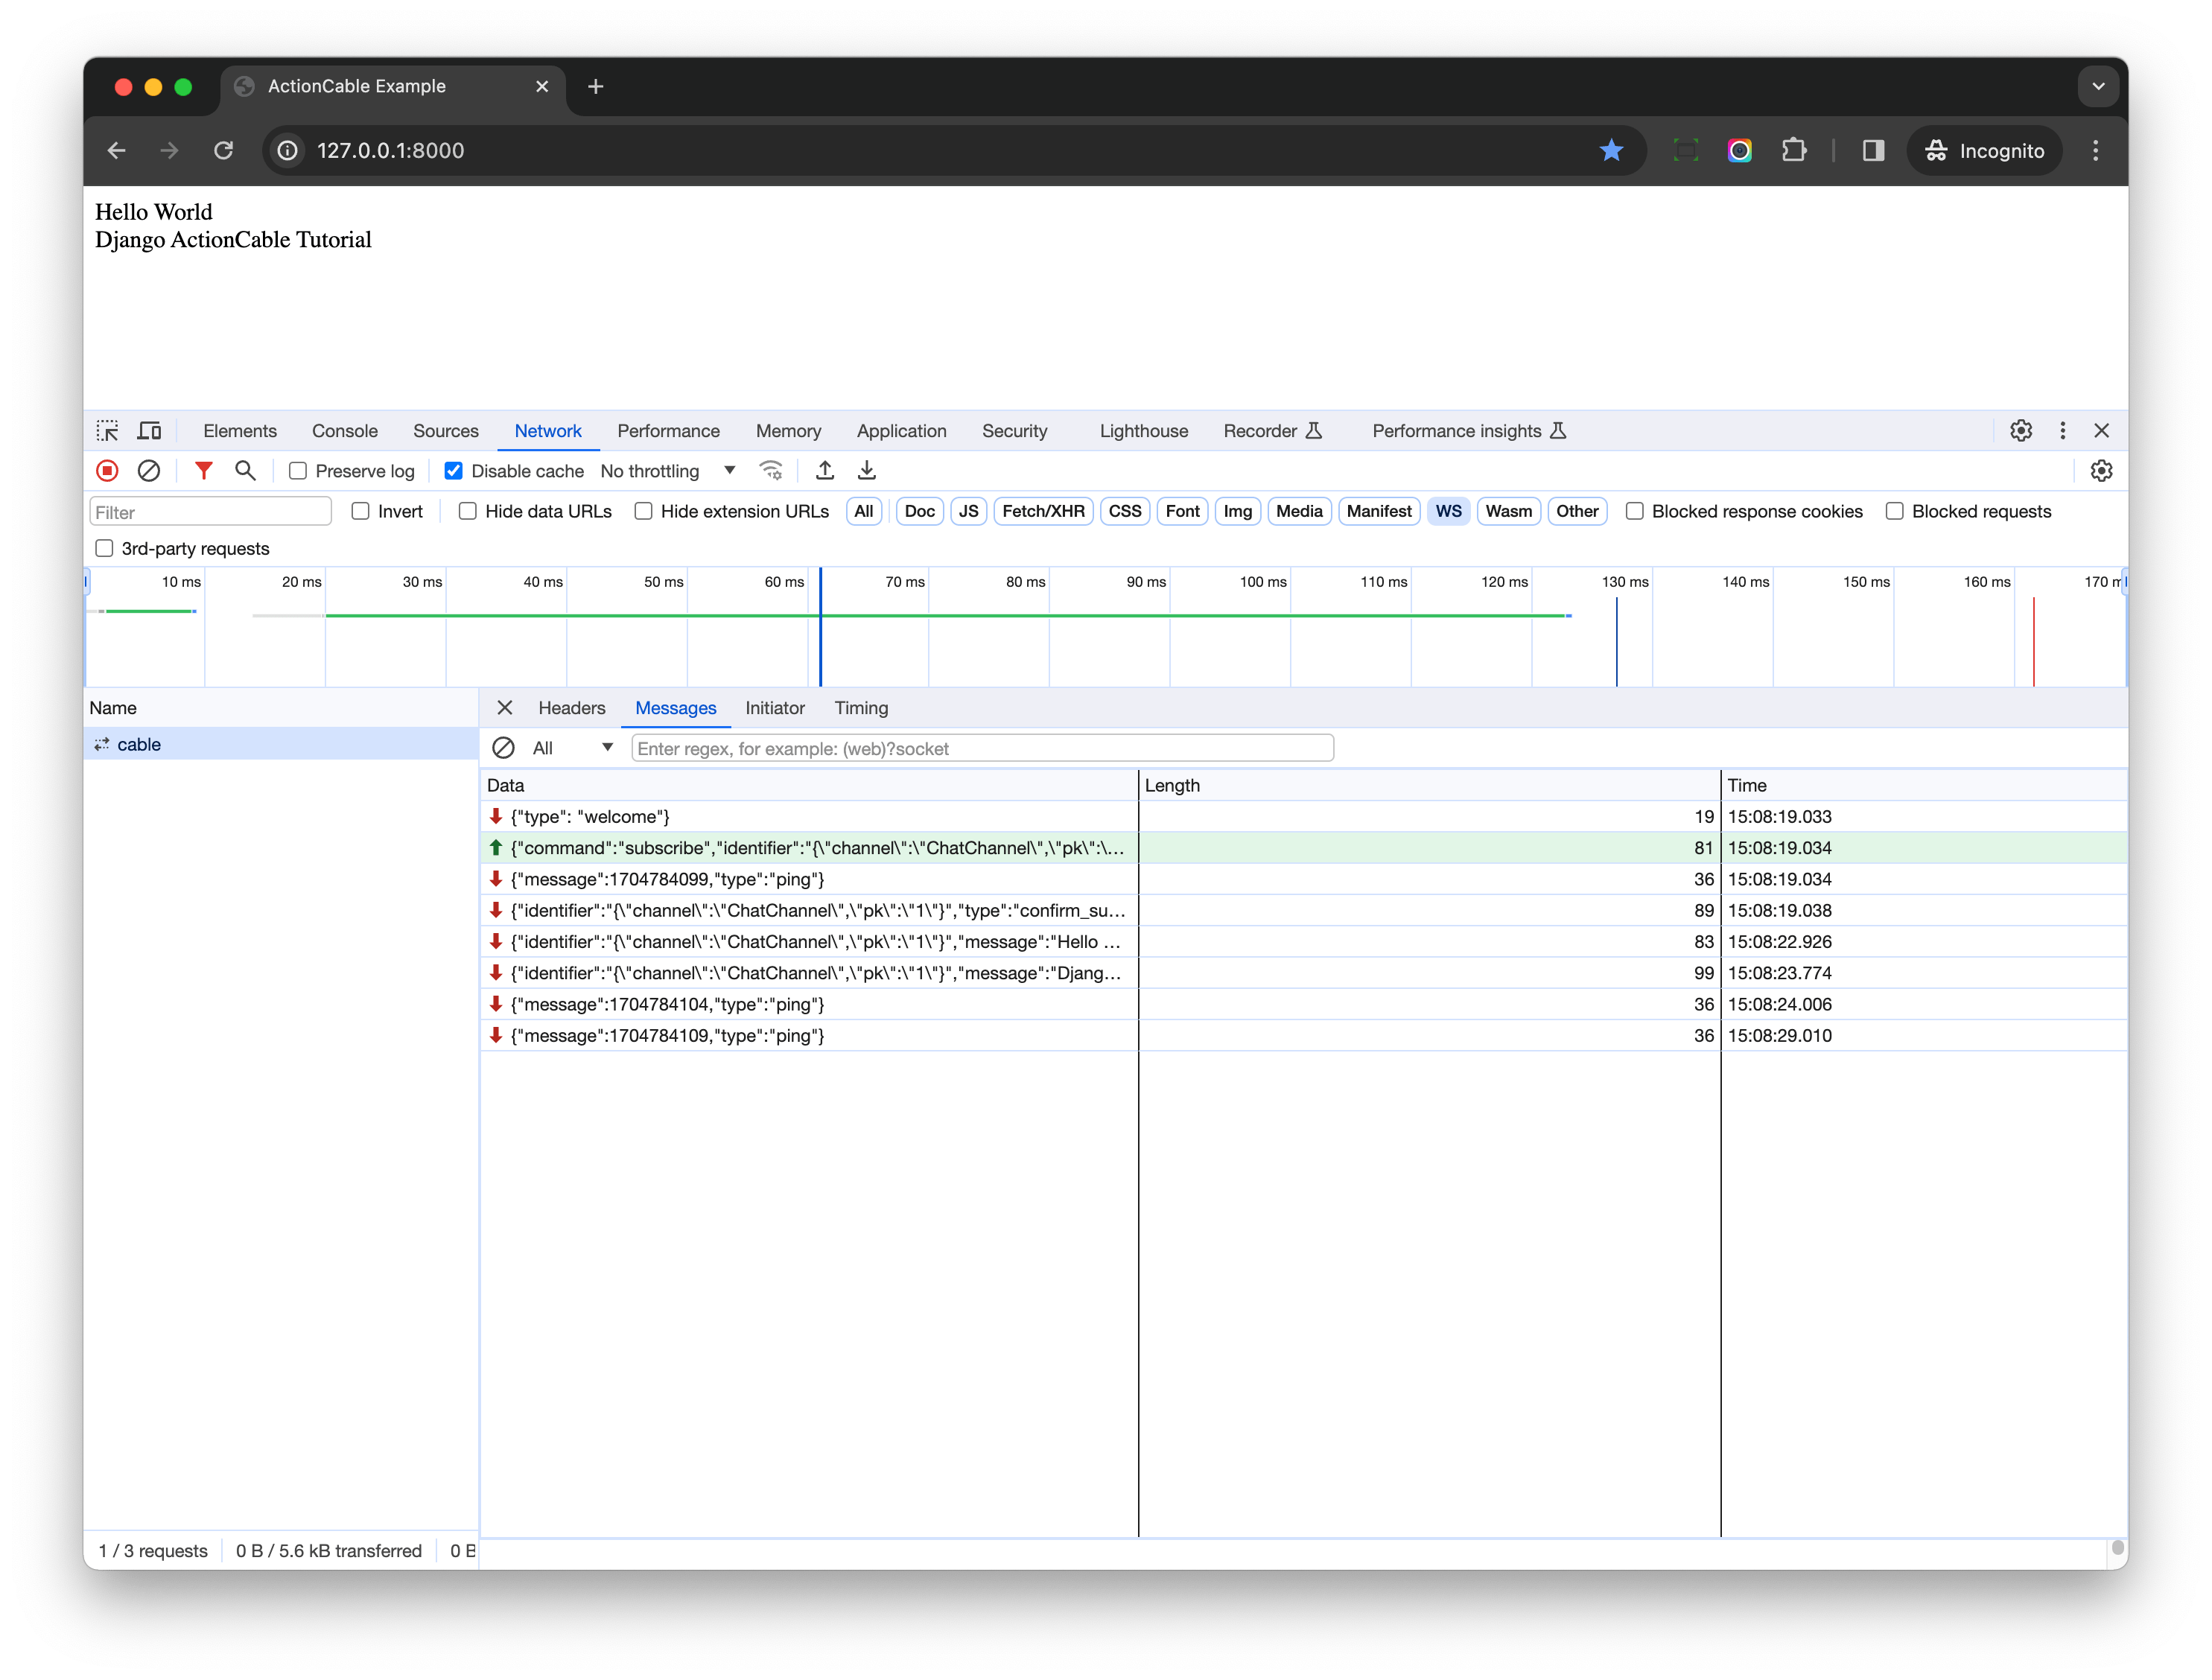
Open localhost:8000, you should be able to see the page.
Launch Django shell, and run below code:
>>> from actioncable import cable_broadcast
>>> cable_broadcast("chat_1", message="Hello World")
cable_broadcast is a wrapper of Django Channel async_to_sync(channel_layer.group_send) method call, we can use it in Django view or external process such as Celery worker to send data to the client browser.
The message value can also be Python dict, and in javascript we can get it in the data parameter of the received callback method.
You should be able to see the message appear on the web page.
Clean Code Structure
With ActionCable, we have clean code structure on both sides
| Client | Server |
|---|---|
| WebNotificationsChannel | WebNotificationsChannel |
| AppearanceChannel | AppearanceChannel |
Custom HTML Element
We can combine ActionCable javascript package with custom HTML element to build some interesting things.
For example, when this element is added on the page, the Javascript will connect to the ActionCable server and subscribe to the channel group chat_{pk} automatically.
<chat-room data-room-pk="1"></chat-room>When the element is removed from the page, the Javascript will unsubscribe from the channel group.
One example is turbo-cable-stream-source custom element
Ecosystem
Since ActionCable provides solid Websocket solution, there are many interesting things built around it.
Turbo Stream
With turbo-cable-stream-source custom element, we can send HTML through Websocket connection and use it to update the DOM of the page, without writing any Javascript code.
This is a very powerful feature and I build django-actionable because of this
If you have no idea what is Turbo Stream, please check below video:
StimulusReflex
At first, I'd like to talk about Phoenix LiveView, which inspired StimulusReflex

Phoenix is a web development framework written in the functional programming language Elixir.
Phoenix LiveView is library which enables rich, real-time user experiences with server-rendered HTML.
The LiveView applications are stateful due to the bidirectional communication with WebSockets.
Events in LiveView are regular messages which may cause changes to its state. Once the state changes, LiveView will re-render the relevant parts of its HTML template and push it back to the browser, which updates itself in the most efficient manner.
A LiveView begins as a regular HTTP request and HTML response, and then upgrades to a stateful view on client connect (Websocket). Any time a stateful view changes or updates its socket assigns, it is automatically re-rendered and the updates are pushed to the client.
StimulusReflex is the Rails equivalent of Phoenix LiveView, and depends on ActionCable to provide the Websocket connection.
Please check https://docs.stimulusreflex.com/ to know more about StimulusReflex
Graphql
We can even deliver GraphQL subscriptions messages via ActionCable, and make Graphql subscriptions work as expected.
This has been done in the Rails community with https://github.com/rmosolgo/graphql-ruby
Other Stuffs You Might be Interested
- Using Action Cable in React (Native)
- Subscribing, Sending and Receiving ActionCable messages with vanilla JavaScript
- ActionCable for iOS
- ActionCable for Android
- Introducing JavaScript and TypeScript client for AnyCable
Conclusion
ActionCable provides solid Websocket solution, and it is very easy to use. I wish Django developers can give it a try instead of writing vanilla Websocket code.
FYI: I am the author of the django-actioncable and I am happy to answer questions.
Happy coding!